Project ideas for paleontology (study of fossils)

Many students find fossils interesting, especially dinosaur fossils.  Remember, only a small percentage of fossils have anything to do with dinosaurs.  By definition a fossil is any remains or trace of a living thing preserved in rock.  Also, we learned very little about a living thing (for example, T. rex) from one fossil.  But by putting together information from hundreds of fossils, we get a pretty good idea of what the animal was like.

Sidewalk fossilsleaf fossil

The concrete of which a sidewalk is made is rock.  To be exact, it is a synthetic calcareous conglomerate.  Synthetic; put together by human rather than by natural processes.  Calcareous; cemented together by calcium carbonate.  Conglomerate; rock made of particles of different sizes mixed together (in this case, sand and gravel).  Since the concrete is rock, remains or traces of living things preserved in the concrete are fossils.  Since such fossils are most often seen in the concrete of sidewalks, we refer to them as "sidewalk fossils" wherever we find them.

Here are some suggestions for science projects relating to sidewalk fossils.  Adjust or change the instructions to fit your assignment requirements, interest, grade level, and available fossils.

Sidewalk fossils survey:

bird footprint 
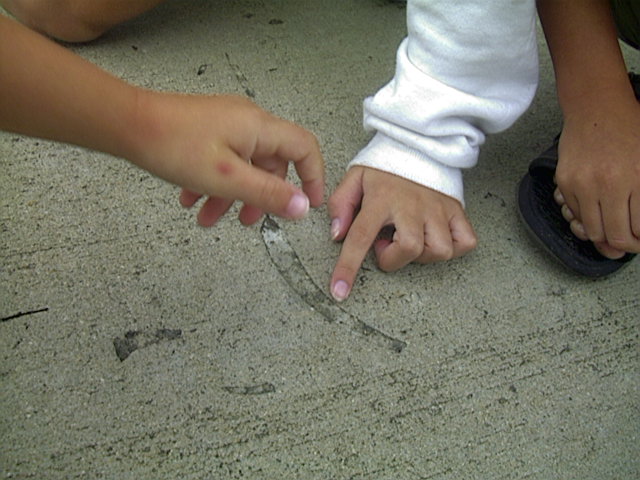
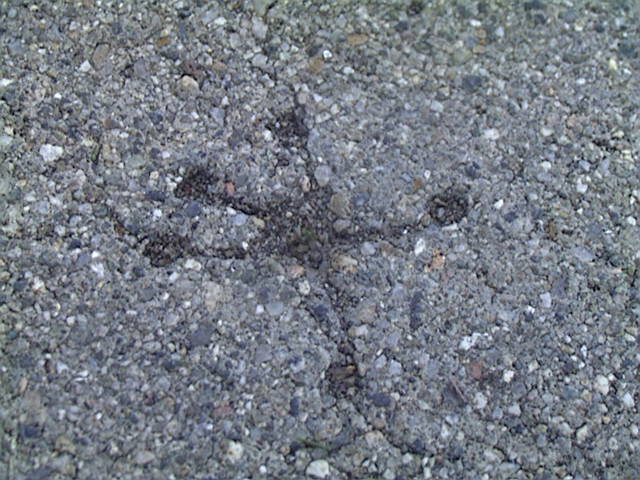
1.  Search your neighborhood sidewalks, driveways, and other places which are paved with concrete.  Look for places where leaves, twigs, or other objects fell into the wet concrete and left an impression.  Look for places where humans or other animals walked across the wet concrete and left prints.  Look for tracks left by wheels rolling across the wet concrete.

2.  Record (That means, "Write it down!" so you or anyone else can find it again.) the locations (street address?) and types of the fossils you find.  A map, even a rough one, might be helpful.

3. Record as much information as you can learn from each of the fossils or groups of fossils. [ Click here for kinds of information you might find. ]  Photographs are a good idea to help explain what you learned.  Drawing diagrams allows you to include only the details you want to show, and also to combine details that show on some fossils and not on others of the same kind.  If possible, use both drawings and photos.

Sidewalk fossils; some experiments:

As you will see, each of these suggestions actually includes more than one experiment.  It is not necessary to perform all of them, select the one(s) of interest to you.  Each experimental procedure should be reported separately.  Each experimental procedure must be repeated enough times to be sure that the results are reliable.

Foot tracks:
1.  By looking at the tracks, if they are several foot prints long, Can you tell the direction of travel?  Can you tell whether theshoe print 
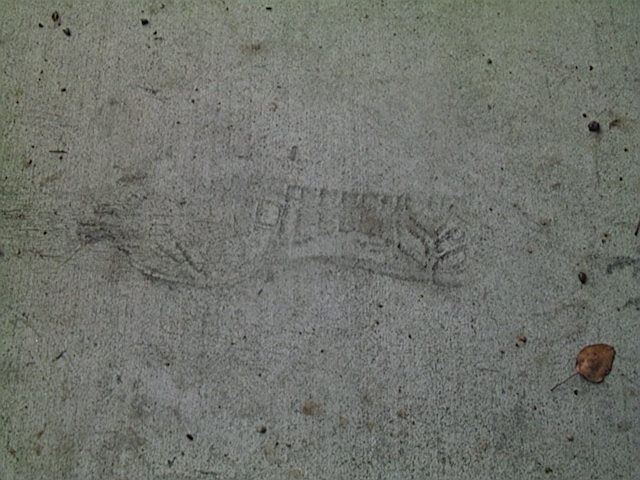
maker of the track was walking, running, jumping, or something else?  Can you tell how fast the person or animal was moving?  

2.  State your hypothesis.  That is, explain how you know (the answer to any of the above questions).  For examples; I know that this person was going west because ...   I know that this dog was running because...  Then explain the clues in the fossils that helped you to figure it out.

3.  Test your hypothesis.  That is set up a controlled situation for making similar tracks so that you know the answer to each question.  Then examine the tracks to see if you would have gotten it right just using the clues you used for the fossils.

Setting up a controlled situation for making tracks:
A.  Persuade the test subject to start in a shallow puddle, to get feet wet, then continue on in a normal fashion leaving wet prints on a dry surface.  You might have to hurry your observations, before the prints evaporate.

B.  Rake and smooth the surface of the sand in a sandbox.  Have the subject make tracks across the smooth sand.  Observe and record what you see in the prints.  Some parks, and beaches have very large areas of sand for making tracks, if there not too many other people around at the time.  You might want to try both damp and dry sand.  How are the results different?
For small animals, hamsters, rats, lizards, fine sand smoothed in a tray or shallow box might work.  For wild birds, try putting the tray on the lawn with some seed along the edges of the tray.

4.  Summarize your results.

Bicycle wheel tracks:

bicycle track 
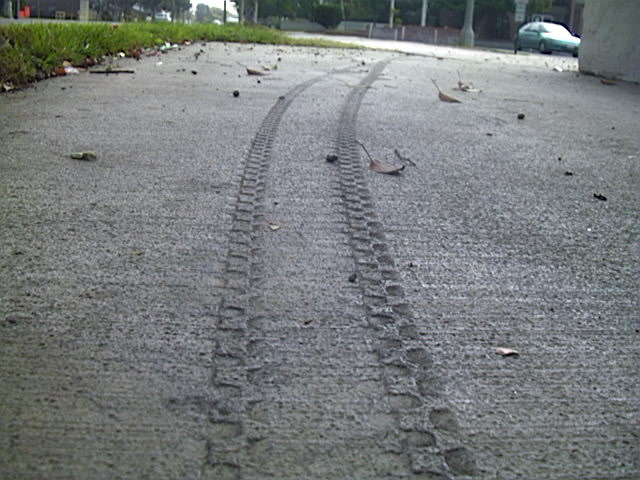
How much can you tell about a bicycle from a clear set of tracks?
1.  How do you know that it was made by a bike?  Can you tell what kind of bike it was?  Can you tell which tire print was from the front wheel?  Can you tell which direction it was going?  Can you tell about how fast it was going?  Is there anything else you can tell about the bike by studying the tracks?

2.  State your hypothesis.  That is, explain how you know (the answer to any of the above questions).  For examples;  I know it was made by a bicycle because ...  I know which track was the front tire because...  I know which direction the bike was going because...  I know about how fast the bike was going because ...  Then explain the clues in the fossils that helped you to figure it out.

3.  Test your hypothesis.  That is set up a controlled situation for making similar tracks so that you know the answer to each question.  Then examine the tracks to see if you would have gotten it right just using the clues you used for the fossils.

Setting up a controlled situation for making tracks:
A.  Ride a bike through a shallow puddle, to get tires wet, then continue on in a normal fashion leaving wet tracks on a dry surface.  You might have to hurry your observations, before the tracks evaporate.

B.  Rake and smooth the surface of the sand in a sandbox.  Ride the bike across the smooth sand.  Observe and record what you see in the prints.  Some parks, and beaches have very large areas of sand for making tracks, if there not too many other people around at the time.  You might want to try both damp and dry sand.  How are the results different?

C.  Make a path of mud which is thick enough to hold the details of the track (It may take some trial and error to get mud that will give the best results.).  Ride the bike along the path.  Examine the track in the mud.  Repeat the ride with different directions, different speeds, different bikes.

4.  Summarize your results.

Other wheel tracks:
The same as for bikes, except these tracks were made by different kinds of wheels vehicles.  Skateboard, roller skates, roller blades, scooter, wheelchair, wagon, other
(See, Bicycle wheel tracks.)


Natural fossils

In many areas natural fossils are more common than many people believe.  A good place to begin locating nearby fossil deposits is with a museum .  Or a society of amateur paleontologists , (Remember, "amateur" means "not paid for their work", it does not mean
, "not experts.")

Rules relating to collecting (keeping) the fossils you find depend on what kind of site it is.  Be sure you know the laws that apply before you pick anything up.  In places such as parks, all fossils found usually belong to the park, and may be added to their museum.  On private land the fossils belong to the owner, unless you have gotten permission to collect.  On some public lands you are permitted to collect surface fossils, but are not permitted to dig far any.

A good science project about fossils does not necessarily require collecting any.  Drawings and photos may serve the purpose quite well.  Drawings can sometimes bring out details which do not show well in photographs.

Fossil deposit survey:

Find a rock formation which contains fossils.  Describe the relationship of the fossil bearing formation to the other rocks in the area.  Describe each of the kinds of fossils you find.  Photos and drawings are very important for this.  

Identify each kind of fossil as nearly as you can.  Classifying fossils to the species level may require help from an expert.  If you are fortunate enough to have expert help available, use it, and give the expert proper credit in your report.  Field guides and other books about fossils will be a great help.  It is probably not worth it to buy a field guide for just one science project, borrow one from a library.  But, here is a link to give you an idea of what books are available for this subject.
   Field Guide to Fossils

Assisting professional paleontologists:fossil bone

At some fossil sites volunteers work along side, and under the direction of professional paleontologists.  Some museums allow
 volunteers to help in cleaning (removing the rock from around it) fossils and preparing them for display and study.  What better way to learn how science really works, than by working beside experts?  

Of many who were searching  the fossil site, this five- year-old made the most significant discovery of the day.  The paleontologist marked the place for further digging to see if more of the skeleton might be there.

The most likely way to find such opportunities is to contact museums and paleontological societies .


Questions not answered?
Ask me (I can always say I don't know)

Please send me e-mail at:  kfuller2001@yahoo.com

Sign Guestbook   View Guestbook


[ Home ]  [ Student Entry ]